Ship Computer
The Ships computer can be accessed by clicking the Manage Ship button at the upper left of the screen then clicking the Computer button (or keyboard command CTRL-C).
A text mode type console will appear with display at top and input at the bottom.
Computer commands involving probing planets can be viewed in the Probing Tutorial.
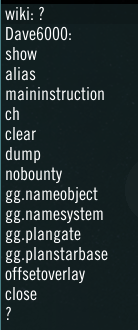
Typing '?' will get a list of commands.
- NOTE: When typing commands into the computer, capitalization is important.
Show
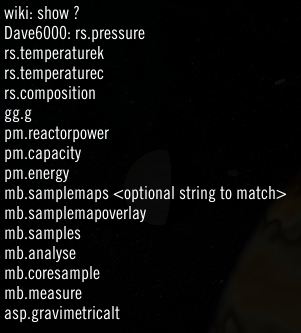
Typing 'show ?'. will get help on the show command
Using the Show command
- rs. relates to the Ram Scoop and takes pressure, temperature composition readings when landed
show rs.pressure
Will give you the atmospheric pressure in bar (1 bar = 1 earth atmospheric pressure)
show rs.temperaturec
Will give the current temperature in degrees Celsius
show rs.temperaturek
Will give the current temperature in degrees Kelvin
show rs.composition
Will give you the gas composition of the atmosphere
- gg. related to the Gravity Generator
show gg.g
Will give you the gravity in g (1g = 1 earth gravity)
- pm. relates to power module
show pm.reactorpower
Gives the reactor output
show pm.capacity
Gives give maximum capacitor capacity
show pm.energy
Gives current capacitor energy level
- mb. relates to the Mining Beam and is used to make core samples deep into the planet surface and to analyse the soil sample taken at EVA.
show mb.samplemaps
Will give a listing of planets with core sampling probes and their current status.
- 'show mb.samplemaps Johneaux6' will list all samplemaps in your database from the johneaux-6 system along with the percent mapped by the probes released.
show mb.samplemapoverlay on
Shows the sample probes final results overlaid on the relevant planet
- Filtering of resources is now available. To display color from a single resource, enter 'show mb.samplemapoverlay on iron' replacing iron for the resource you want to find.
- Multiple resources can be displayed by listing them separated by a comma. 'show mb.samplemapoverlay on iron,carbon' will display only iron and carbon deposits.
show mb.samples
Will list all the soil samples you have obtained.
- The soil sample reading will be indicative of the overall planet resources. It varies from location to location depending on conditions.
show mb.analyse <sample name>
Will analyse a soil sample and give a result. eg: show mb.analyse Jam1 Rocky Planet (3)
- The system and object name most be entered exactly as it is displayed in the 'show mb.samples' list.
show mb.coresample
Will activate the mining beam to sample the planet deeper below the surface.
- Your ship will need to be above the surface, close to the surface, totally stopped, and facing the surface to take readings.
- The core sample reading will be indicative of the one spot(tile) where the sample was taken.
show mb.measure
Will activate a laser beam on your ship and measure the distance of an object in front of you.
show asp.gravimetricalt
Will display the altitude you are from the object you are close to.
- Adding this to a maininstruction will allow you to fly up and see your altitude to place an OSB much easier.
Alias
Typing 'alias ?' will give you help on the alias command
Alias is used to make shortcuts for the long commands in the above 'show' section
NOTE: If you make an alias title as a key word, commands with those key words will not work anymore as intended. An example would be "show", you can't use the show command anymore as it is aliased to something else. alias add show show mb.samples
What you could do is then make an alias which is "sh" instead of show so you can use "sh" instead of show.
Given that nested aliases don't work and maininstructions don't parse for aliases, this could be quite workable. It's probably a lot more intuitive to avoid using "show" or other command keywords for aliases however.
Add
Adding an alias takes the format of 'alias add name instruction'
eg 'alias add list show mb.samples' will alow you to just type list in future to show all your soil samples
Linking to ctrl 1 through ctrl 0
alias add ctrl#
- example- alias add ctrl1 ch eject 999999 silicon - will make it so any time you press ctrl-1 ( both keys) you will eject all silicon up to 999999. Once the alias is set, you can close the Ship Computer (crtl -c) and still eject.
Numbers are 1,2,3,4,5,6,7,8,9 and 0.
List
typing 'alias list' will list the aliases you have programmed
Remove
Typing 'alias remove <name>' will remove the alias you programed with that name
Maininstruction
Typing 'maininstruction ?' will give you help on the maininstruction command
maininstruction lets you run other instructions continuously, displaying the results on you main interface.
There are 5 boxes on your main interface that can display data, labeled 0 - 4, just above your speed indicator.
NOTE:- You cannot have a multiline output as a maininstruction,
Waervyn's maininstruction Video
Add
To add a display module use the format 'maininstruction add display (0-4) suffix instruction'
0-4 being one of 5 locations
suffix being some text behind the output to tell you what it is about
instruction is one of the 'show' instructions from above
note:- need to use plain text, no special characters.. no : etc
Examples:
To display the current outside temperature in the first slot above the speed indicator: maininstruction add display 0 Celsius show rs.temperaturec
Show the planetoid gravity level: maininstruction add display 1 grav show gg.g
List
this will list the current running instructions with the number so you can remove the correct one when required
type 'maininstruction list'
Remove
removes one of the running instructions
eg after you listed the instructions, you want to remove the first instuction.. instruction 0, type 'maininstruction remove 0'
ch
- ch relates to Cargo Hold
ch eject <quantity> <item>
Is used to eject stuff out of the cargo hold, such as unwanted minerals and passengers
Examples:
ch eject 100 silicon Ejects up to 100 silicon in the cargo hold.
ch eject 100 core sampling probe This command is also used to deploy 100 Core Sampling Probes to scan planet surfaces for minerals.
clear
Used to clear collected planet data. You may want to use the dump command first to save your data if you want to delete soil samples. The clear overlay command removes the current overlay if the overlay is active (it does not delete your map data).
clear soilsamples
Will clear all soil samples from your ship database. It is highly recommended that you 'dump soilsamples' before using this command. This will create a text file of raw soil sample data that can be converted by several player tools.
- After collecting hundreds of soil samples, your ship computer can lag while recording more. By clearing soil samples, it will speed the recording process and remove the several second delay that develops.
clear overlay
Will clear the color map overlay so they planet or moon will appear as it normally does.
dump
Soil samples can be dumped into a file on your hard drive.
dump soilsamples
When executed, it will tell you the path to find the file and a file prefix of soilsampledump-######.txt, where ###### is a big number(Unix date stamp).
File dump location could be in:
C:\Users\{WindowsUserName}\AppData\LocalLow\Fluffy Kitten Studios\Ascent_ The Space Game\
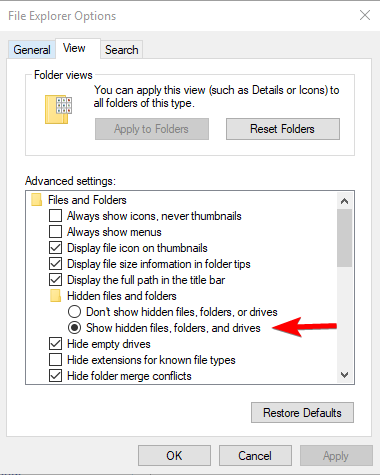
This is a hidden folder and you will need to set your folder options to show hidden folders before you can access the folder.
OR
nobounty
When a player takes a soil sample, the user has the option to automatically share their discovery with players through a bounty system. If your soil sample matches the parameters of a bounty, then you are paid the bounty with credits and your soil sample discovery information is shared with the bounty payer(another player). The bounty payer will receive Mail with the soil sample details displayed on screen when you took the soil sample. Default is 'nobounty off', which means every soil sample you gather will be checked with the bounty database. To turn off the soil sample sharing, type in 'nobounty on'.
nobounty on
When on, you will not receive bounties for any soil samples that match bounties placed by other players. By doing this, this means no one except yourself will see the soil samples are you taking. This will keep all your soil samples secure only in your database.
nobounty off
When off, you will be paid bounties from the UNCA AND players who have paid bounties for systems that match the soil sample levels they set when placing the bounty.
gg.nameobject
Allows an elected Governor of a system object to rename object from Rocky Planet ## to a familiar, personalized name when the Governor of the object is in gravitational range (View Range or closer) to the object. Players entering the system will see the name in place of the object type and number in the Autopilot.
gg.namesystem
Allows the elected Senator of the system to rename the star system. It will take up to 24 hours, but the Map will update and all will see the new name listed on the Map.
gg.plangate
Allows the elected Senator of current system to plan a gate to another system. This command will be executed in originating system where player is the Senator. The Senator then jumps to the system they would like to plan a gate pair to connect. This command is executed again in the arrived in system. This will create two proposed gates in each system. The Senator of the second system will get Mail asking for approval. Once approved, gates will immediately switch to planned gates and be ready to accept materials.
For material requirements to build gates, visit [[1]] to get a detailed breakdown.
gg.planstarbase
This command allows the player to plan an Outer Star Base(OSB).
The player must be at least 200,000 meters above an existing colony to successfully link an OSB to the existing colony. When linked, the OSB is free of Stellar Credit costs.
A OSB can be planned unlinked from a player colony with this command also. If unlinked, it will cost 80 Steller Credits to plan it and 40 Steller Credits each successive month afterwards to maintain the lease on it.
offsetoverlay
Command Syntax: offsetoverlay .0000,.0000
No spaces before or after the comma. Always use .0000 to make small enough adjustments. The adjustments can be reset by entering offsetoverlay 0,0
Once the mb.samplemapoverlay is called up, a unique problem often occurs. The core of this issue is because the color overlay draws rectangles on a spherical object. The Unity engine that is used has no way to compensate for this on a global scale. Because of this, often the rectangular boxes we often call plots are skewed and out of line with the actual resources on the planet. The closer a colony is to a pole, the worse it becomes.
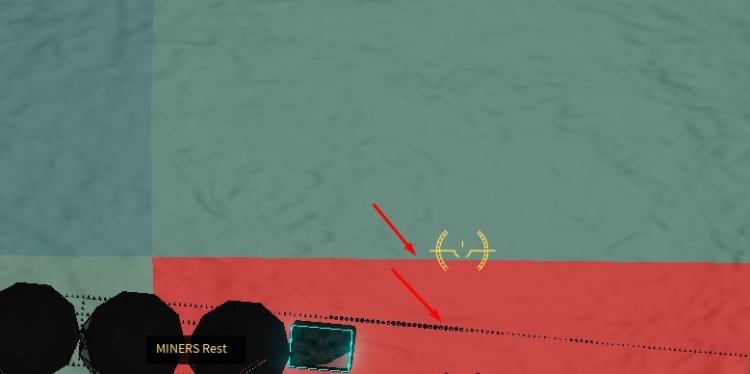
In the image, it is easy to see that the color overlay is not parallel with the individual lines we place structures upon. To help compensate for this a ship computer command has been implemented called "offsetoverlay." It will adjust the overlay to better match the boundaries of the resources. While it will not be perfect, it will get you much closer once adjusted. The adjustment is also remembered, so you will only need to figure it out once. Below is a basic tutorial to help give you a place to start.
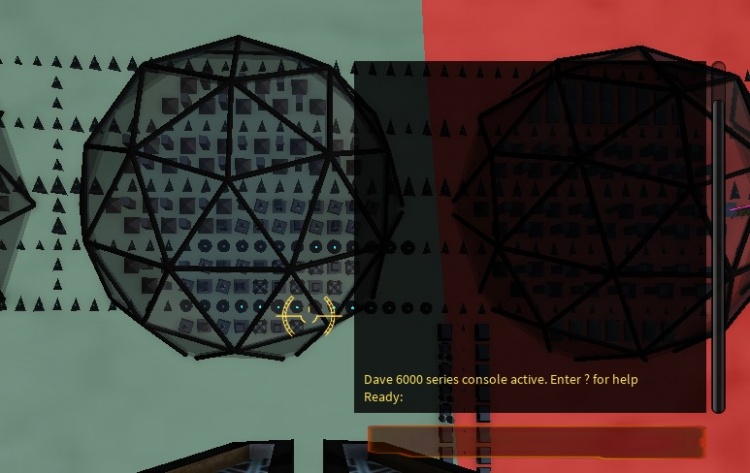
Below is an image after show mb.samplemapoverlay on has been called. This can be built into a simple alias. For this tutorial, the alias plot is being used to call the command show mb.samplemapoverlay on.
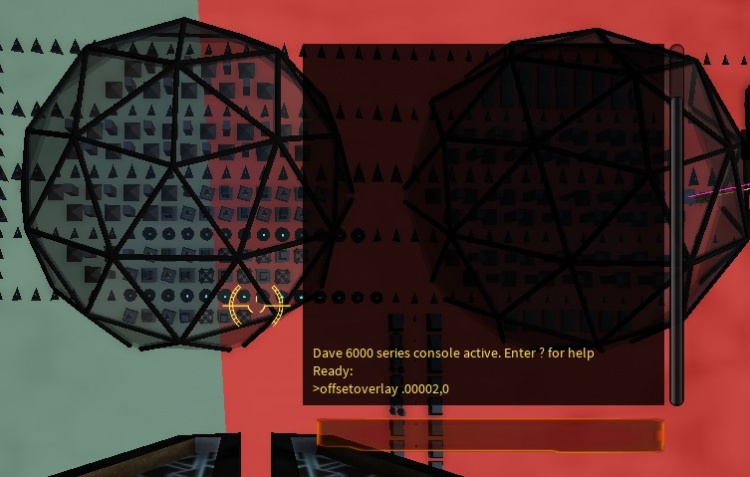
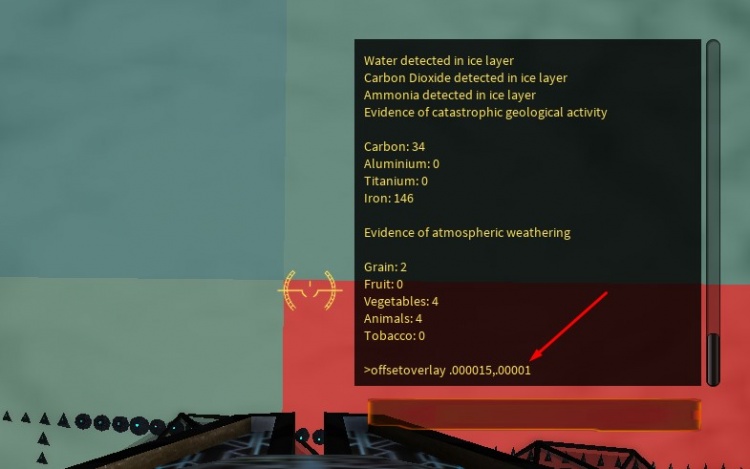
The aiming recticle in the center of the screen in 1st person view has been positioned on the line between the carbon rich plot on the left and the iron rich plot on the right. At this location, the line has shifted 8 tiles to the right. For this tutorial, we will move the plot to the left, then move it down a little afterwards. Both can be done at once, or individually, whichever is easier. We will first adjust the x coordinates. Direction is often difficult to determine, yet for this tutorial, north is up and west is left. We need to move the plot to the left 8 tiles. We do this with the offset command followed by the amount we want to adjust. Care MUST be used while adjusting. To move it small amounts, numbers in the ten thousandths must be used. This is means any number you add should have a .0000 leading any number. This also means .00002 is actually more than .000015 for those not used to decimals. If this is confusing you, enter the same amount of numbers for each decimal. This means .00002 will be .000020 to match the 6 decimal length of .000015. Hiding the .0000 will allow you to see that 20 is higher than 15. So 20 will move the offset more than 15. Lets take a look at this in practice. "offset .00002,0" was entered to move the offset left. It moved it about 10 tiles. The 0 after the comma is for the y coordinates. We will adjust that later.
Again, the recticle is pointing right on the boundary between these two plots. We can see that it was adjusted a little too far. This can be corrected by entering the command again lowering the number a little. If the plot needed to be moved to the east, right in this instance, we would use a negative number like -.000020. By slowly reentering the offsetoverlay command we can easily adjust this.
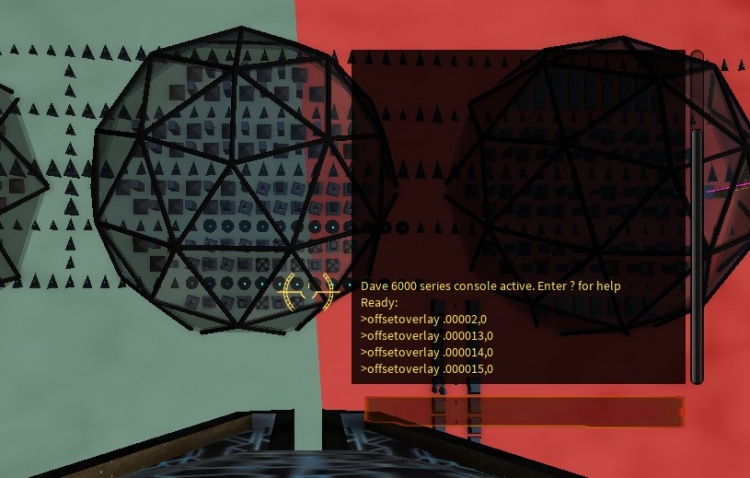
Adjusting the x coordinate to .000015 moved the color overlay right on the boundary. The great thing about this command is the color overlay adjustment happens immediately. A new overlay does not need to be created, it just adjusts the existing overlay instantly. Once you enter the command, you can see the results right away.
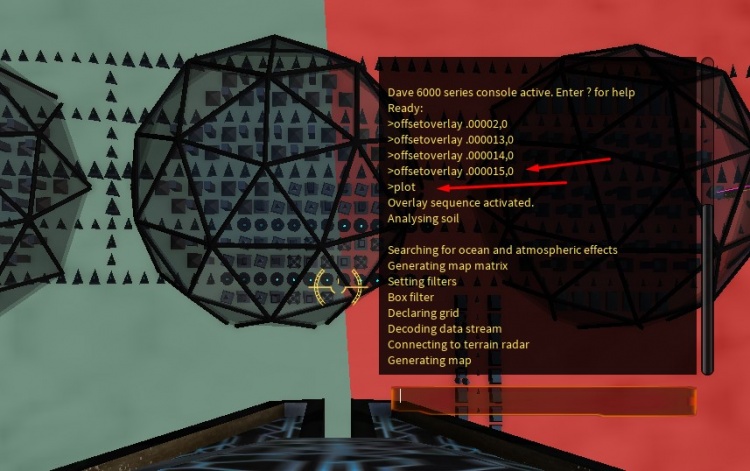
The image below shows that the offset adjustment is remembered. Once it was set at .000015, the "plot" alias was called which executes the "show mb.smaplemapoverlay on" again. After it was redrawn, it can be seen that it is in the same place as the previous adjustment without the need to add any more numbers.
Now let us move on to the y coordinate. With adding .00001 on the y coordinate, the plot adjusted down 3 tiles and lined up well with the plot color. Because of the curved longitudinal and latitudinal lines, the adjustment might be perfect in one area of the colony and slightly off in another, but it will be much closer than what is found without the offset adjustment.
Hopefully, this will assist you in taking advantage of a great feature. If this is still confusing, feel free to ask for help in the help channel in game. There are others who can help you work though this.
close
Typing 'close' will close the computer console.
?
Enter ? and receive the list in the image above.
Back to Main Page
